

Acting For Animation: Character Animation – Working With Dialogue
Listening to those voices in your head
In the last tutorial we looked at the different types of generic characters that you may well come across when you are animating, and how you can go about getting to know them a little better so that you start to understand how they move. In this tutorial we are going to look at the voices that you have to work with, how they can help you to understand characters feelings at a specific time, how to interpret them and how to ensure that they work seamlessly with your animation.
If you are planning to direct a voice recording session then there are a few things to bear in mind. With consideration you should be able to get just what you want from your voice artist and a result that will definitely shape the performance of your animation. But you can’t just wander into the studio and ask your voice artist to start reading. As a director you need to be clear in your own mind exactly what is going on in each scene. You may well end up working with a script written by someone else in which case it is really important that you have figured out what actions each of the characters are going to perform before hand, Usually this happens when you are storyboarding the work, but if you haven’t got to that stage when you get into the recording studio then it’s vital that you know the script inside out as you will have to guide the voice artists.
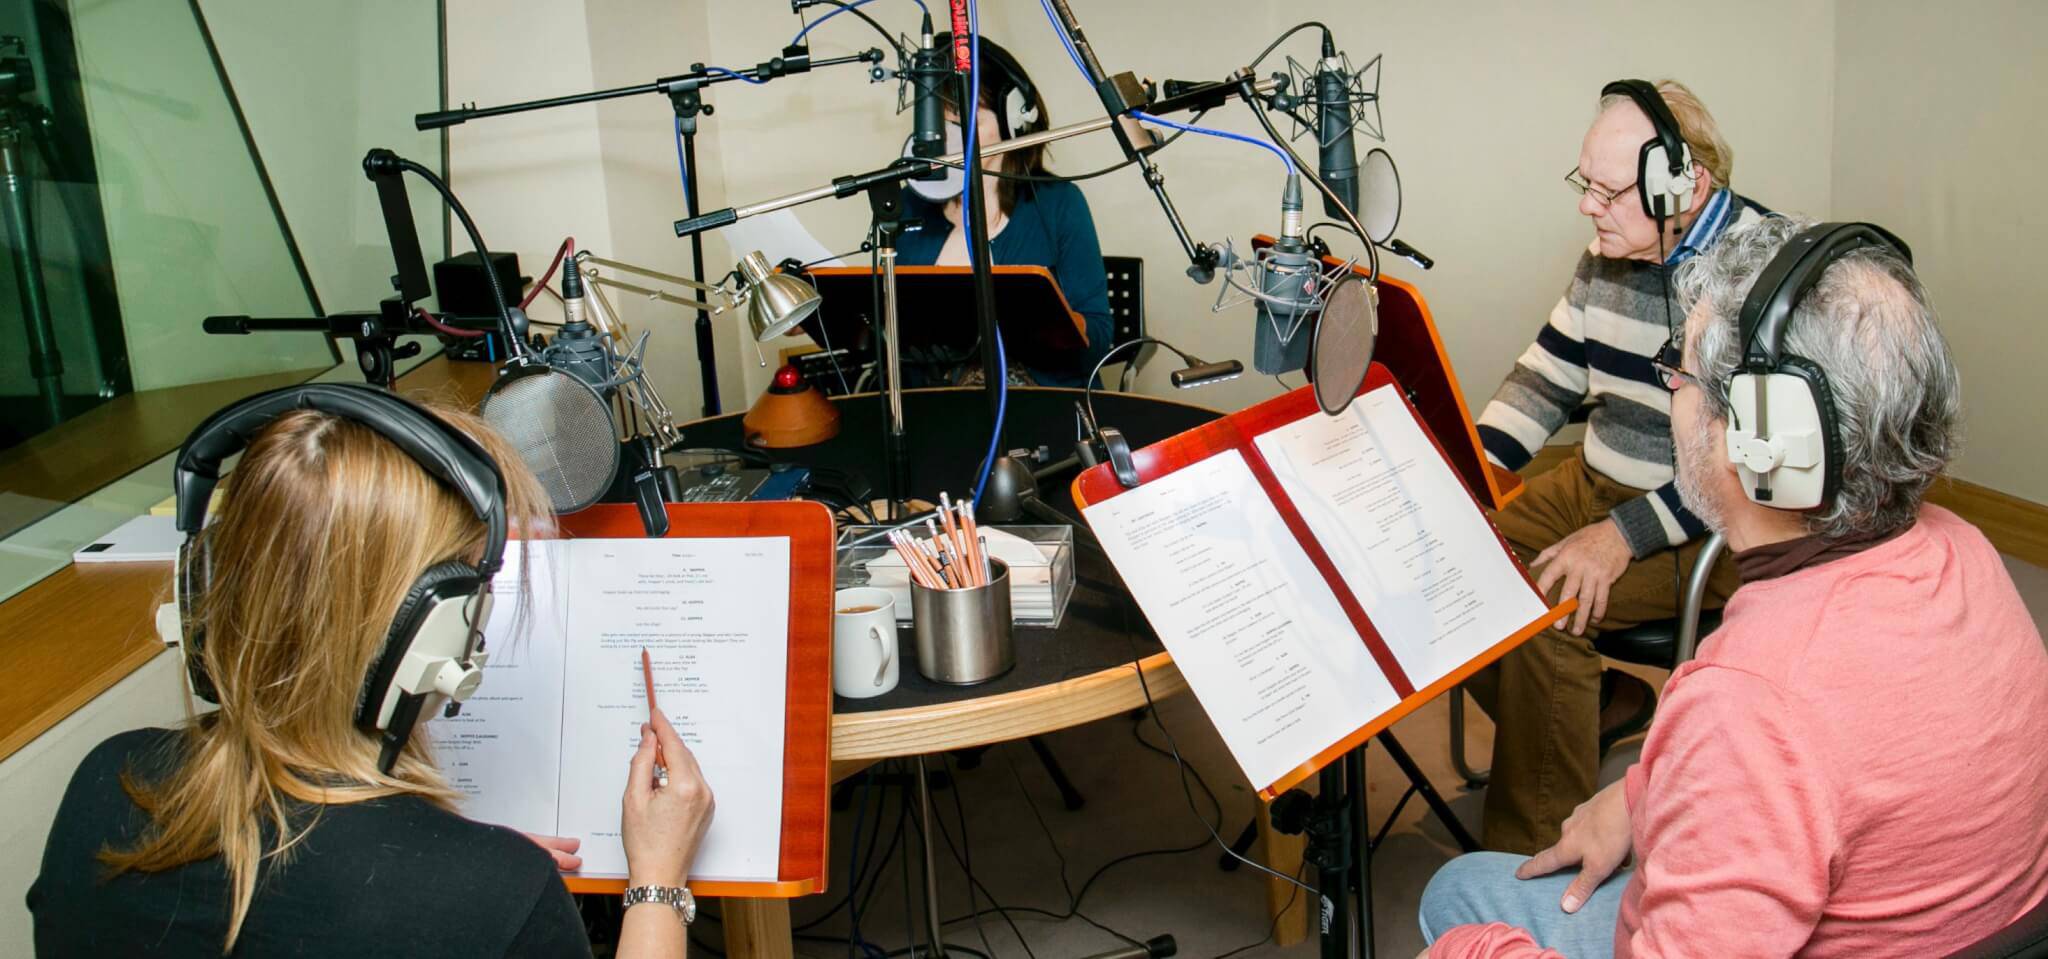
A still from a voice recording session with voice actors Sir David Jason and Jimmy Hibbert. Working with all your voice actors in one session can really help the performances as each of your actors will get to hear the other performances and respond to them, even though you will record each one separately. Photo: Jimmy Hibbert.
It’s usually a good idea to send your voice artists a copy of the script in advance of the recording session so that they can prepare themselves. Once they are behind the mic you will need to give them a clear idea of what the action in the scene is, so that they can get the intonation right, and put in those little extra bits that bring the words to life. It’s a two way process though, and a good director is one that allows every member of the team to have a creative input, so don’t be too dictatorial and let your voice talent show their talents!
Before you get in the studio make sure that you have plenty of copies of the script ready. You will need one for yourself, one for the engineer and one for each of your actors. It’s also your job to make your actors feel as relaxed as possible, and if they see that you are organised and on top of the job then this will help enormously. It’s also a good idea to make sure that there is water for them to drink too as you don’t want the performance to be dry and croaky!
Whenever I had to direct a recording session I found it useful to have a copy of the script with me that I had prepared in advance. I would separate out each block of dialogue that the characters spoke, and next to them add four columns down the right hand side. The first column was for the ‘Read Through’ and the other three for takes one to three. Then as the voice artist read their lines I would mark with a tick or a cross against each one whether the take was ok or not. But you have to work quickly and pay close attention to the delivery of the lines. Marking off each take is helpful when it comes to cutting the clips together as you could point out which take to use. As you listen to the voice artist deliver each line I would also suggest making notes, or highlighting key words or sentences as they say them, so that you can go back to the voice artist and ask them to make subtle changes to the emphasis or intonation. Once you are sure that you have everything covered then I would suggest that you spend a few minutes asking your actor or actress to give you some emotives – little grunts, huffs or chuckles – that you can drop in once the animation is finished. It’s easier and cheaper to do it that way rather than to get them to come back in at a later date.
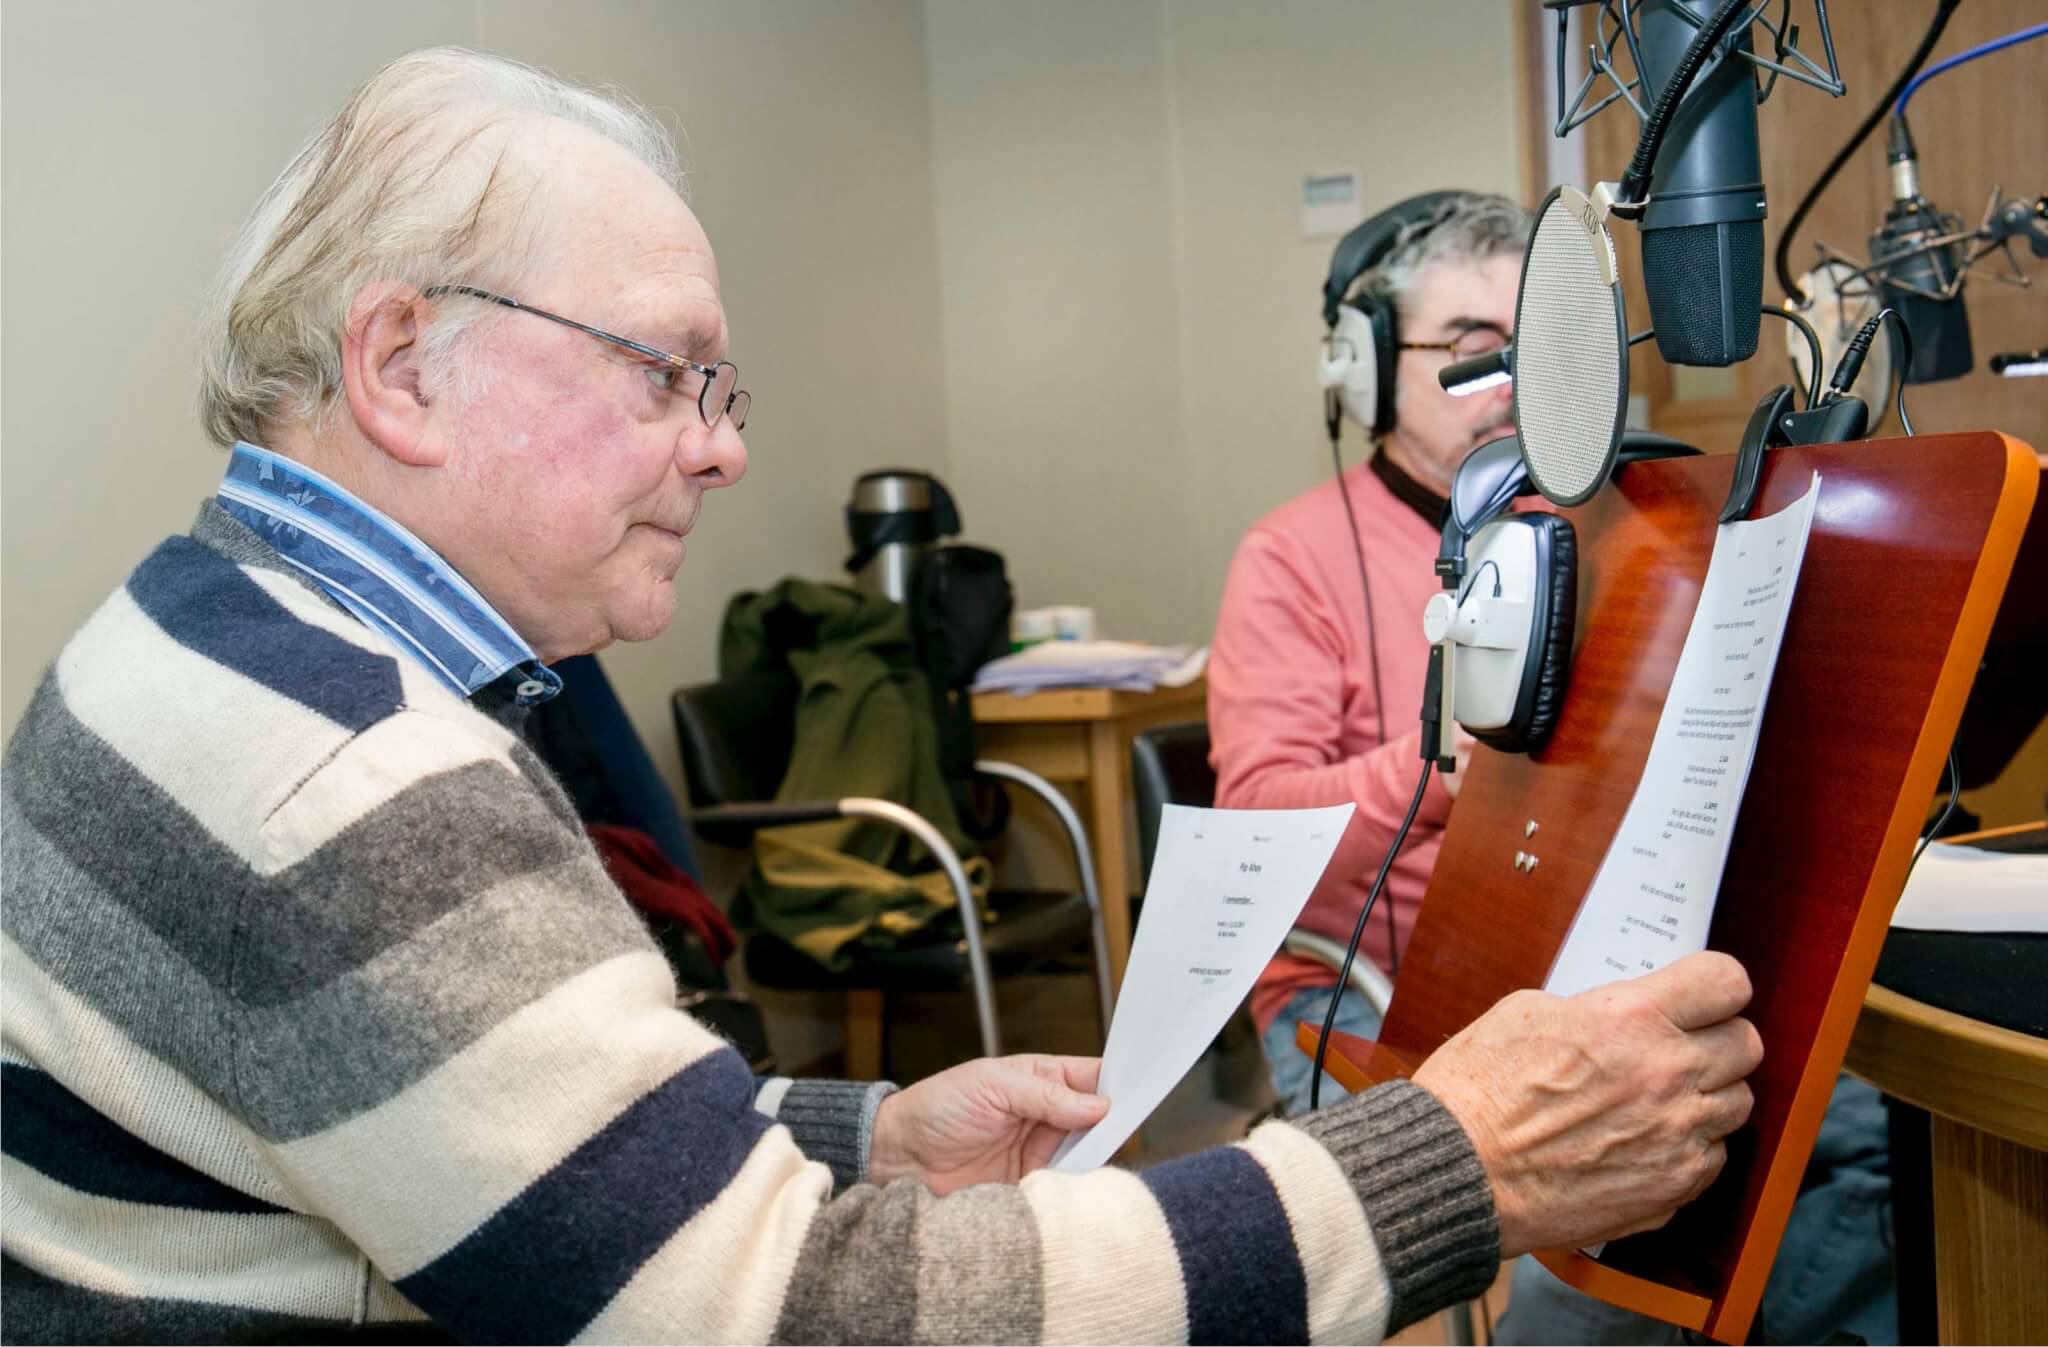
A still from a voice recording session with voice actors Sir David Jason and Jimmy Hibbert. Give your actors plenty of time to familiarise themselves with the scripts before the recording session so that they can bring something of themselves to the performance. Photo: Jimmy Hibbert.
But you might be working on a much smaller budget and scale sometimes, and making things at home perhaps. With some reasonably priced recording equipment, such as the Marantz PMD660 or the Tascam DR07 (both of which you can pick up for £100 or less) and a bit of imagination you can get a decent recording. The most important thing to do when you are preparing to record is to make sure that you set everything up in the quietest place possible, and somewhere where there are as few reflective surfaces as possible, like laminate floors. A carpeted bedroom can make an ideal studio, and if you end up recording in yours then I would suggest you do it under the duvet. This can have a dampening effect in a similar way to acoustic foam. It can make for a bit of an intimate recording session though! Otherwise why not get the real deal and invest in some acoustic foam panels. Suppliers such as eFoam.co.uk offer 24 305mm x 305mm x 40mm convoluted panels for just over £30 so you could make yourself a small five-sided ‘soundproofed’ box. Simply place your recorder in the box and ask your voice artist to lean in through the open side of your box and deliver their lines.
How do I make sense of all this?
Having recorded the voices you need to be able to work with them frame by frame. This process is called breaking down. This is a crucial stage as it is this that is going to enable you to properly plan your animation and ensure that it fits with the rhythm of the dialogue. There are a number of specialist animation programs such as Dragonframe (a purpose made stop motion capture software) that can help you to do this in a pretty straight forward way but they all broadly follow the principle of dope sheeting.
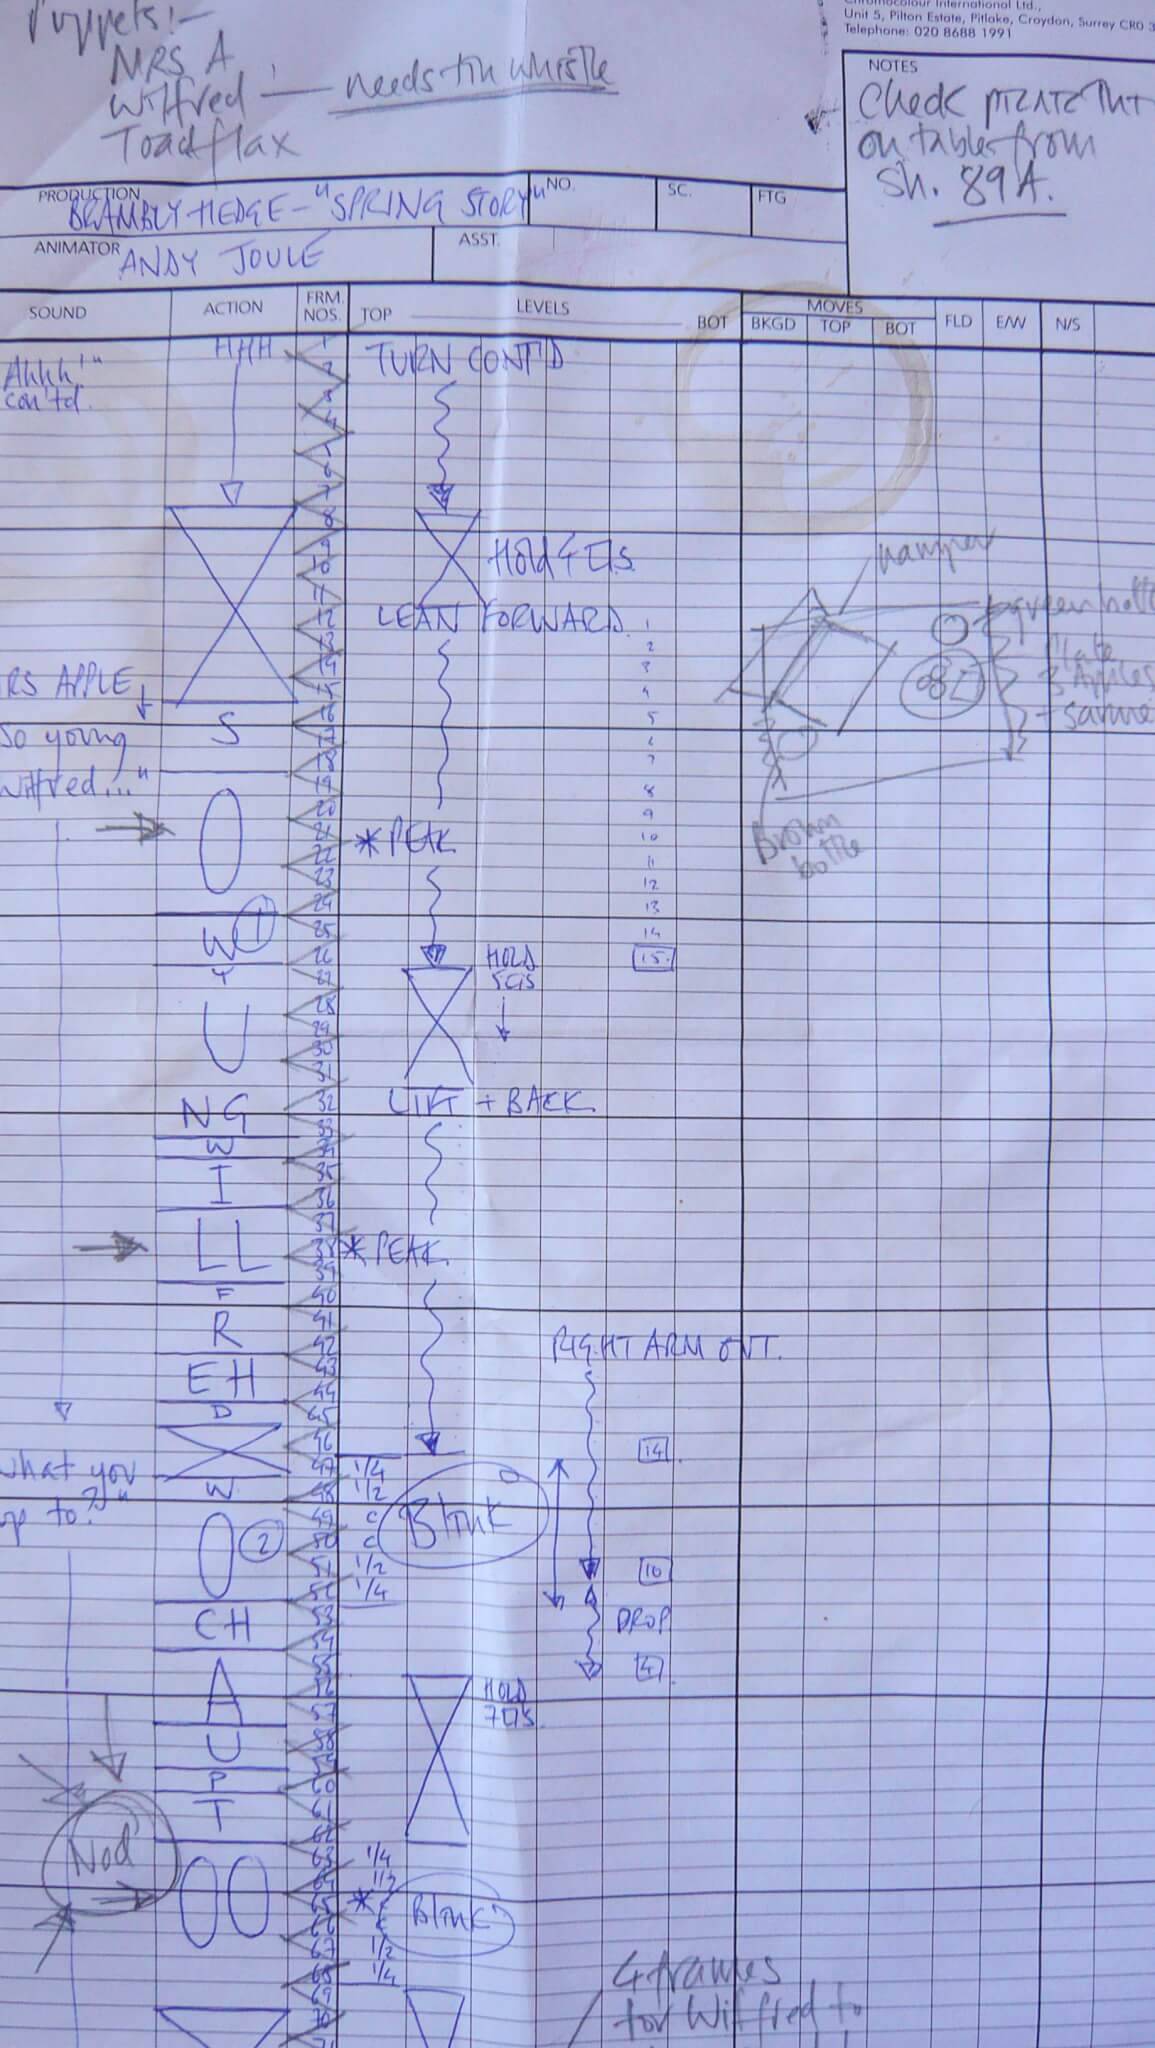
A typical dope sheet. You can see from this sheet how I have worked out when the characters movements should start and end matching them to the dialogue which has been phonetically broken down frame by frame. Use them as an aide-memoir for the action in the scene to help with continuity too. Photo: Andy Joule.
For those that might not be familiar with them a dope sheet is a large sheet of paper with a grid printed on it and were really designed for animators to leave clear instructions for the camera operators on how to film the various cels that they had produced. Down the left hand-side you would number the grid from 1 to 100 (for the number of frames), and then working across the sheet you would leave notes on which cel goes where, when a camera move starts or what is to happen to the background layers. Whenever I had to work with dialogue I always found it useful to use a dope sheet, and if I was fortunate enough someone would have broken the dialogue down frame by frame for me. Otherwise I would have to quickly break the dialogue down. The frame numbers would still go down the left hand-side and then the dialogue would then be written out one frame at a time phonetically. It’s handy to also have the actual words spoken written out properly so that you can reference that – reading phonetically written language can be somewhat confusing at times and you need to know exactly what is being said so that you can get your character to act accordingly.
Even if the program that you use has a dope sheet I would still advocate using the old-fashioned paper approach too. The main reason for doing this is that you can getter a better over-view of the whole shot by looking at all the sheets, rather than the range that you can access in the shooting and dope sheet window on your computer. Having that overview is really important as it means that you can plan your characters moves so that it has a better flow to it and doesn’t become too littered with gestures. On your dope sheet you should write down exactly when a move is planned to start or stop, and work out periods of time where your character stops (perhaps as they listen to another character talking). And if that is the case then you should make a careful note of how long they remain inactive. You should try and keep your character alive at all times, but that doesn’t mean that they have to be moving all the time. A simple blink is all you need oftentimes, but like all movements make sure you make a note of when they occur on your dope sheet. If you don’t the danger is that you could end up with a character that blinks incessantly.
Get your mouth around this!
Once you have your recording you will need to be able to listen to it one frame at a time and for this I would recommend dropping the audio file into an editing program like Adobe Premiere. The reason I suggest this is because you can then sit at your computer, headphones on and scrub through the audio with the cursor keys, and look at the wave form on the audio track. The wave form will give you a visual indication of when words start, and when they reach their peak. But by stepping through the audio a frame at a time it means that you can break down the audio and work out what sound (and mouth shape) is needed at what point. Breaking down the audio is not the most rewarding of tasks, and can take some time, but it’s worth doing. Remember to write out your dialogue phonetically so for example the word ‘cast’ could be written out as ‘k.aarrr.ss.t’. Having a phonetic version will help you to get the mouth shapes right for the lip-synch.
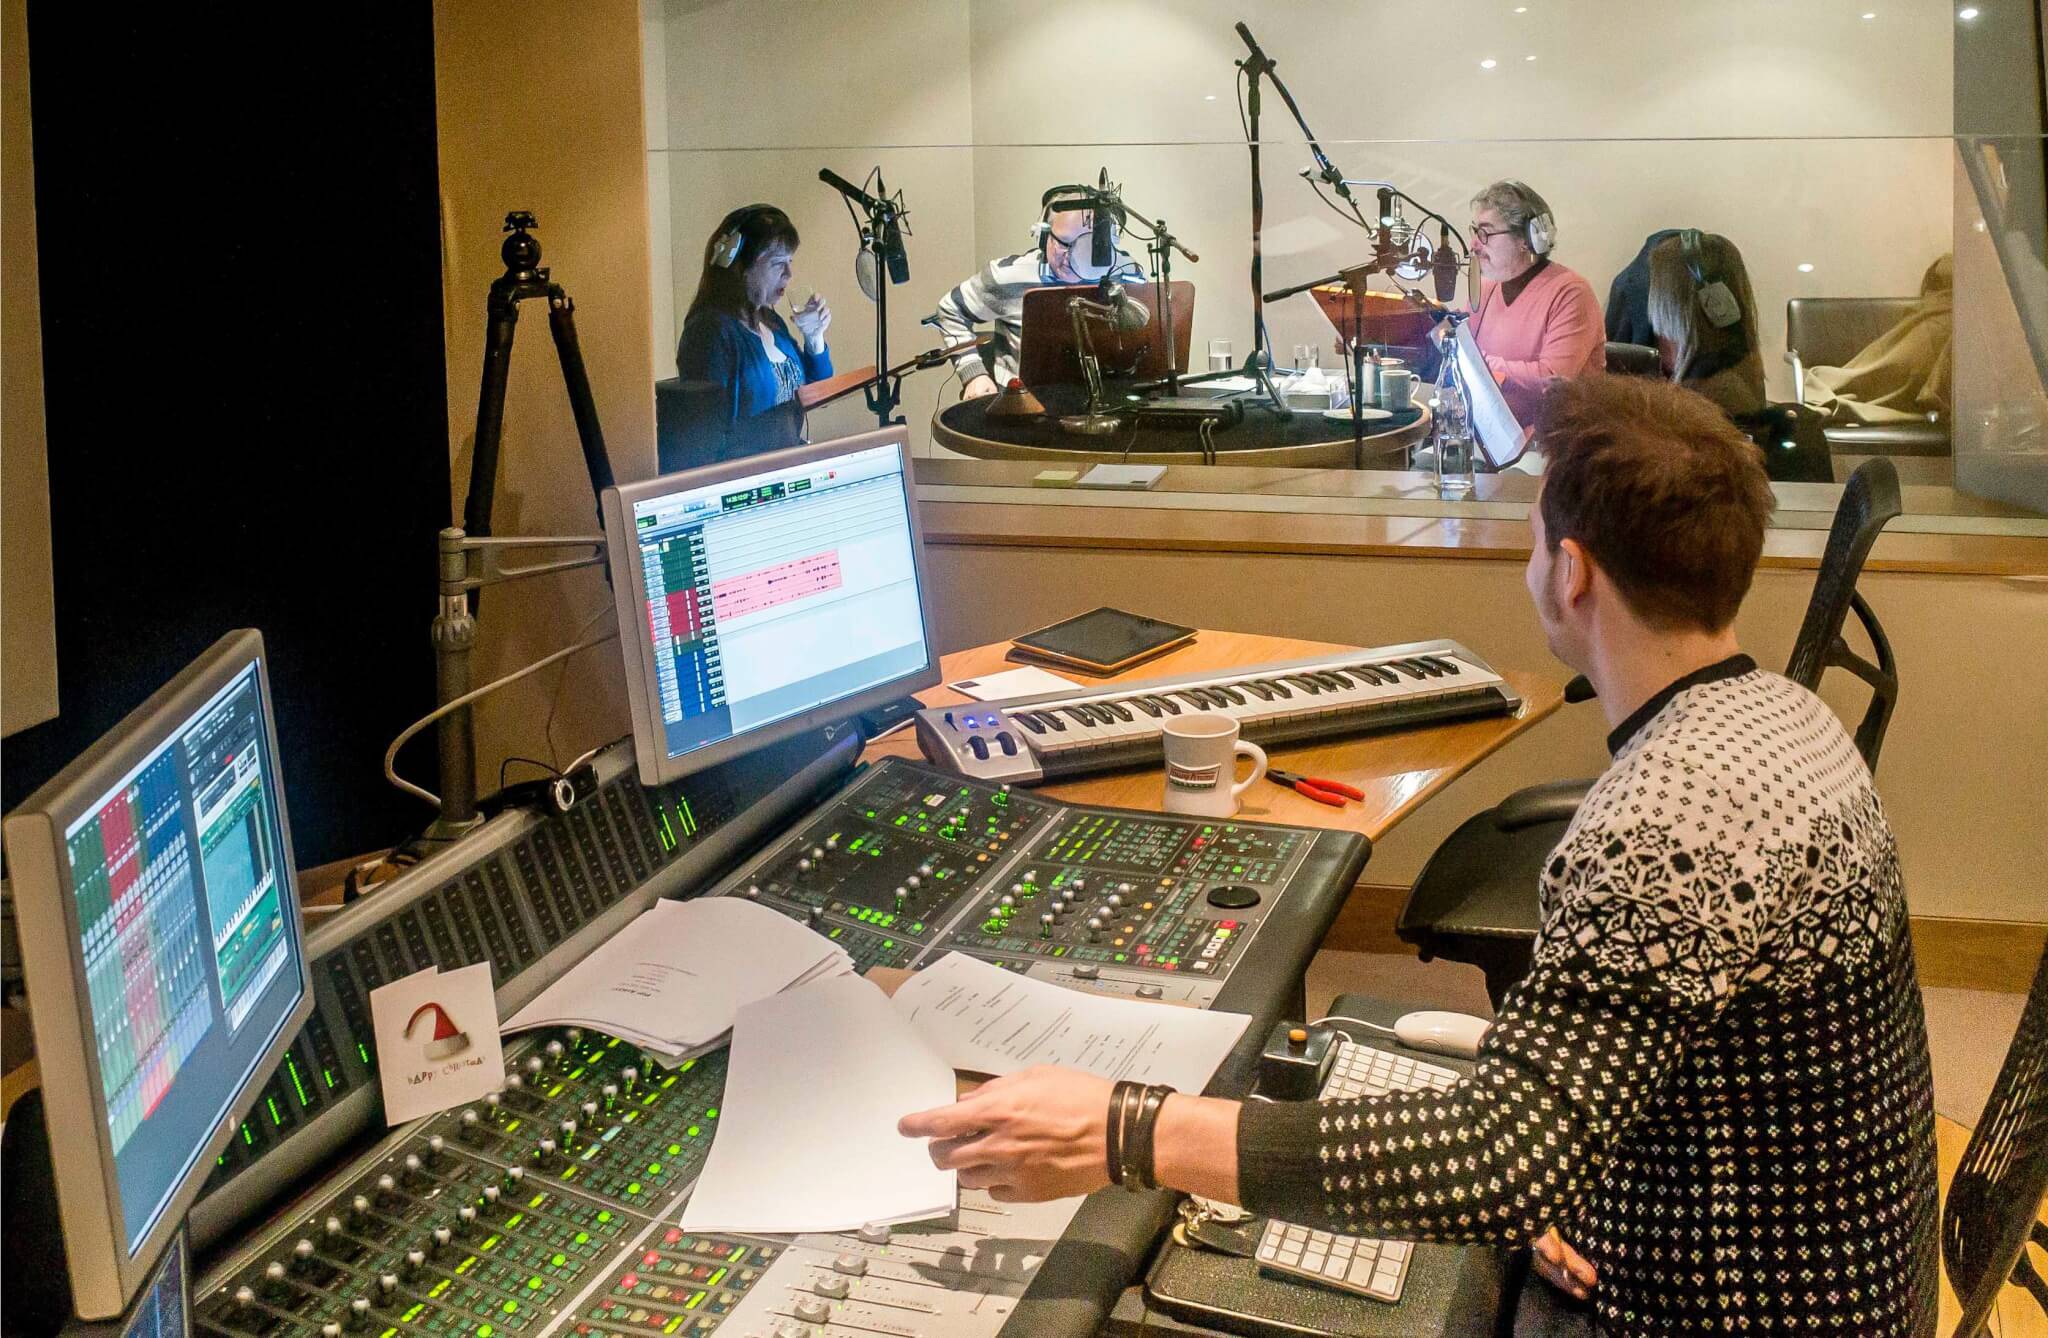
A still from a voice recording session with voice actors Sir David Jason and Jimmy Hibbert. Working in a professional studio can be quite an experience and working with a good engineer is essential. However you can get some pretty good results without all of this if you do your homework! Photo: Jimmy Hibbert.
There are a few very simple rules to follow when it comes to lip-synching your animation. The main one is to try and keep it as simple as possible and not to over-animate the mouth. You don’t need to animate every single frame, and if you did the result would look crazily erratic. From your dope sheet you will see where the mouth should be closed – on the letters ‘B, F, M, P & V’ (although strictly speaking both ‘F’ and ‘V’ have the top teeth biting into the lower lip) but for the others it’s a case of a properly closed mouth. There’s a similar situation for the letter ‘L’ where you will need to show a little bit of the character’s tongue, curled round with the tip of the tongue tucked up behind the top teeth. The tongue is also a key element for ‘TH’ where you should quickly show the tip of the characters tongue between closed teeth. The teeth are a key again with the ‘CH’ sound where you will need to give your character a nice wide mouth and teeth closed. ‘SH’ is similar to ‘CH’, but with a more pursed mouth shape. For these consonants you need to hit these points accurately as it will be really obvious in your animation if these are in the wrong place. You might also find that when you listen through your audio track that these consonants might only last for one frame, but I would recommend holding them for two frames so that they ‘read’ more clearly. You also need to look at the wave form in your audio track and see when the voice is at its loudest (in case you were in any doubt, you should be able to hear that, but at a frame at a time finding that peak is easier to see) and make a note on your dope sheet. This then is where the mouth needs to be at its most extreme.
But with lip synching the main thing to avoid is the ‘flappy’ mouth! This happens when an animator has the mouth open when the character is speaking a word, and then snaps it shut as soon as that word is finished. As you dope sheet your dialogue you will see that there are often little pauses between words and these pauses can be any length, from one frame upwards. Avoid the temptation to close the characters mouth during these pauses though. If you watch someone talking you will see that their mouth is generally always open, even when they have finished speaking. So do the same with your animation, and when your character comes to the end of their line just leave the mouth open slightly, with a gentle easing towards a loose ‘half open half closed’ position. This will avoid the flappy mouth and give your lip-synch a much more natural feel. Keep your character’s mouth loose and simple.
Listen, listen & listen
As an animator working with dialogue the one thing you should do is listen to the audio track of the scene that you have been given. You need to listen to it exhaustively so that you know every element of it inside out. There might be subtle little vocal triggers that you can pin acutely observed eye movements to for instance. The eyes and eyebrows are as much a part of lip-synching as the mouth is so don’t forget to animate them! Your job as the animator is to imagine that you are delivering the lines and acting them out. Your role then is to make your characters act as you would. All good character animators should be able to listen to the voice track and then imagine the actions that go alongside the words spoken. This is where you as a good character animator need to be able to empathise with the situation that your character faces. To be honest the most important thing for any animator to get to grips with is empathy. Put yourself in the same place as your character, imagine what they are going through and be aware of how we, as individuals, react. It’s a complex thing to master, but the sooner that you pay attention to this and respond to it, the quicker you as an animator will come up with a plausible performance.
Planning for success
Remember to use your dope sheet to plan out your animation, not only to figure out the logistics of the lip-synch but so that you can plan out the body movements and gestures. A good tip is to get the peak of your movement to coincide with the peak in the audio track in same way that the mouth shape will be at its most extreme at the loudest point. I would recommend marking that point on your dope sheet and then work backwards from that. Now you should have timed your gestures when you acted them out as a matter of course and so you will have a clear idea how long (in frames) that these should be. For example if you know that the gesture you need to make is 32 frames long overall, and that the peak in the dialogue happens 14 frames in to the sentence then I would suggest that the biggest movement occurs on that 14th frame in the audio, gradually accelerating up to it.

A still from a voice recording session with voice actors Sir David Jason, Jimmy Hibbert & Brian Trueman. Allow your voice actors some freedom in the performance. If you are too rigid in your direction the performances can be a little dull. Let them have fun and the results will be much more successful. Photo: Jimmy Hibbert.
You will also want your gesture to continue after that peak, gradually slowing down. It depends on whether you want your biggest movement to occur right in the middle of the gesture, or for it to be slightly off-centre but in this instance let’s agree that it’s going to happen in the middle of the 32 frames. So work back 16 frames (halfway through your 32 frame gesture) from that peak point and mark out on your dope sheet that this is where the gesture needs to start. In this instance it would mean that your gesture starts 2 frames before the audio starts. By working in this way you can methodically plan your animation. It is worth remembering that each gesture should be given time to read, rather than going from one gesture straight into another and so on. You don’t have to have your characters moving all the time, it’s not like real life, and if they don’t have time to ‘rest’ after each gesture then your performance will start to lose credibility and your character will start to look too frenetic. You can afford to allow your characters to drift between each gesture – that is where rather than stopping dead at the end of a gesture you allow the character to slowly move and then accelerate off again into the next gesture. This is relatively easy to achieve in 2D and CG animation, but slightly more tricky in stop motion where you can end up making a multitude of miniscule movements! Don’t forget that when you are animating it should be the character that is talking that moves the most. It can sometimes feel as if your non-talking characters are lifeless but you want your audience to focus on the right thing, so if you have a scene with several characters then keep the silent ones alive with subtle head moves, by shifting their weight a bit or even a simple blink and keep the lively stuff for the one that is talking. Again using your dope sheet will help you to plan this so that you can see at a glance where and when your ‘extras’ have or need to move.
Now you’re ready to go and animate. You should have a better understanding of your characters, and what to think about in terms of creating a good performance, through timing and observation. And now you have a good idea of how to plan out your shots and to get them to synch up with the audio. So next time we will go on to take a look at your stories and how you can start to develop more interesting narratives as well as how to get your work to look unique, with your own sense of design.